Showing posts with label Thermomix. Show all posts

Friday, January 22, 2016

Thermomix 3 little teddies

Adapted from :
http://www.trtlmt.com.au/teeny-teddies/
Ingredients
  1. 60g butter, cubed
  2. 140g honey- I used raw honey
  3. 1/2 teaspoon vanilla bean paste
  4. 170g plain flour
  5. 65g self raising flour
  6. 1/2 teaspooon bi carb soda
Instructions
  1. Place butter, honey and vanilla into bowl.
  2. Melt at 100 degrees, speed 2 for 5 minutes.
  3. Add remaining ingredients.
  4. Mix on speed 3 for 30 seconds
  5. This will be a sticky, wet dough. It firms upon cooling however.
  6. Remove dough from bowl or saucepan and place onto a silicone mat in a rectangle shape to cool for 30-45 minutes. Be careful as this will be hot. Do not put it in the fridge or leave it too long as it will be harder to work with. I manage to work on it immediately without waiting. The consistency was just right 
  7. Preheat oven to 180 degrees. Line two large baking trays with baking paper.
  8. Once dough is slightly cooled and easy to work with, roll out into a thin rectangle about 2mm in thickness. When I roll, I lift and flip it over a few times whilst rolling to ensure its an even roll. Work gently and slowly when lifting and flipping.
  9. If your dough is sticky allow it to cool a little longer. You want a dough that is able to be lifted from the surface it is being rolled on.
  10. Using a small teddy cutter cut shapes from the dough. You may choose to cut and then place the teddy on the tray or you may chose to cut them all at once then peel away from the mat and put on the tray. You can see both options in the blog photo.
  11. These will only need to bake for 5-8 minutes or so. Watch them very carefully. You want them golden and a crunch to them. If you do not cook long enough you may have less crunchy teddies on day two and beyond. Do not overcook though. Burnt honey is not tasty. Every oven varies so watch them closely. I baked mine in 5 minutes.


Tuesday, January 19, 2016

Red Pesto Recipe

Adapted from SkinnyMixer: skinnymixers.com.au/skinnymixers-red-pesto


I have modified to suit our family's taste


Ingredients:
340g sun dried tomatoes
150g raw cashew
80g olive oil
4 cloves garlic
70g roasted capsicum (in bottle)
40g tomato paste
a handful of fresh basil leaves
40g pitted kalamata olives
pinch of salt


Method:
Place all ingredients in TMX. blend for 30sec/Speed 5 until desired consistency


Tastes great as dip, salad, pasta

Wednesday, December 23, 2015

Boil Christmas Cake

Adapted from : http://www.themotherhubbardscupboard.com/boiled-fruit-cake/


Ingredients

375g Mixed Fruit (pre packed mixed dried fruit or your own concoction)

7 Dates

7 Dessert Figs

2 Tablespoons of Fig Jam

1 Cup Brown Sugar (160g)

1 Cup Water (250g)

125g Butter

3 Eggs

1/2 cup Brandy (optional)

1/2 teaspoon Bicarbonate of soda

1 Cup Plain Flour

1 Cup Self Raising


1. Place pitted dates and figs into the bowl, chop 3 seconds/speed 7.

2. Place butter,  mixed fruit,  jam, sugar, and water into the mixing bowl and cook 13 minutes/100 degrees/reverse/speed 1.

3. Add rum (optional) and bicarbonate, stir for 30 seconds/reverse/speed 3. I omit alcohol for this time

Leave to cool for almost 4-5 hours.

4. When mixture is completely cool and you are ready to cook. Preheat oven to 120 degrees and prepare cake tin (20cm round) with 2 layers of baking paper on the bottom and sides (this is to stop the cake from drying out.

5. Place eggs and flour into the cooled fruit mixture and 1. mix 2 minutes/reverse/speed 3 then pour out into prepared tin

oven for 2 hours or when a cake skewer comes out clean. Leave in the tin to cool (As stated, I normally turn off the oven after 2 hours and leave overnight to cool)

7. When cake is cold, wrap in aluminium foil then plastic wrap and keep in the fridge, it is a very moist cake and will get mouldy if left out! Then you can wrap it all nice and pretty and give it to friends.


Monday, December 21, 2015

Gingerbread Cookies

Adapted from:
http://thermobliss.com/the-best-thermomix-gingerbread-recipe/

I doubled the recipe


INGREDIENTS
  • 1/2 cup of golden syrup
  • 1/2 cup of brown sugar
  • 3 tablespoons of ground ginger
  • 2 teaspoon of cinnamon
  • 2 teaspoon of bicarbonate of soda
  • 250g of butter - chopped into cubes
  • 2 egg
  • 4 1/2 cups of plain flour
INSTRUCTIONS
  1. Preheat your oven to 180 degrees and line two baking trays with paper.
  2. Place the golden syrup, sugar, butter and spices into your Thermomix bowl and cook for 5 minutes at 50 degrees on speed 2.
  3. Add the egg and mix for 3 seconds on speed 3.
  4. Add the flour and bicarbonate of soda and mix for 10 seconds on speed 5 or until combined.
  5. Knead for 2 minutes before turning the dough out onto your Thermomat and lightly knead to form a ball.
  6. Flatten the dough into a disc, cover with cling wrap and place in the fridge for 30 minutes.
  7. Roll the Gingerbread dough between two sheets of baking paper until approximately 5mm thick. Use cutters of your choice to cut out shapes and place on baking trays. Bake for approximately 9 - 11 minutes - please note baking times will vary depending on the size of the cutter used.
  8. Allow the gingerbread to cool and decorate as desired.
* I had to add a it more flour as mixture was too wet. After resting in the fridge for 40 mins, it was much workable but became soft quickly. Had to put inside fridge to make it workable again.
Baking was fast, 11minutes was perfect for mine cookies. I used the large gingerbread cookie cutter as it will be used for decorating.


Tuesday, December 15, 2015

Easy Thermomix Rich Chocolate Cake

Adapted from:
http://www.recipecommunity.com.au/baking-sweet-recipes/rich-chocolate-cake/17281

INGREDIENTS

Rich Chocolate Cake

  • 200 g dark chocolate,, broken into pieces
  • 180 g sugar
  • 180 g unsalted butter,, cut into pieces
  • 50 g plain flour
  • 1 pinch of salt
  • 3 eggs
  • 150 g fresh or frozen raspberries


RECIPE'S PREPARATION

Rich Chocolate Cake
1. 
Preheat oven to 190°C.

2. 
Place chocolate, butter and sugar into mixing bowl and melt for 5 min/60°C/speed 2. Don't be concerned if the sugar doesn't dissolve, just make sure the chocolate and butter have melted.

3. 
Add flour, a pinch of salt and eggs and mix for 15 sec/speed 4.

4. 
Pour into a lined 20cm round cake tin and bake for 20-30 minutes or until the edges have come away from the sides of the tin and a skewer tests almost clean.

5. 
Garnish with raspberries before serving.

TIP

This cake is best eaten cold as it almost sets when it is cooling to a fudgy interior and chewy sugary crust. Just lovely.
Dust with icing sugar or top with chocolate icing to serve. This cake is wonderful as a rich, decadent dessert cake.
Use any flour you like. Self raising flour for a lighter cake, plain flour for a denser cake, gluten free flour for people with allergies or spelt flour for the extra protein.Use any sugar you like. I've used white sugar and rapadura sugar in this recipe and both work well.

Saturday, December 12, 2015

Gummy lollies tmx way


1 litre of fruit juice. Ensure to sieve
12 tbs of gelatine powder. Soaked into juice for 10 minutes
Pour into tmx, cooked 5mins on 50C , Sp2
Added 2 tbs sugar
Pour into mold and chill for 1-2 hours 

Tuesday, April 29, 2014

Pizza Sauce

-1kg tomatoes
- handful of basil
- 2 cloves garlic
- one small onion
- teaspoon of dried oregano
-salt n pepper for taste
- teaspoon of sugar

Method:
1.Place onion, garlic and basil in TM bowl and chop for 5 sec on speed 7
2. Saute on Varoma tempreature for 4 minutes on speed 1
3. Place remaining ingredients and cook on Varoma for 20 minutes until sauce thickens
4. Blitz to smooth sauce slowly to Speed 9 for a few second. Enough for 8 large pizzas.


Friday, February 28, 2014

Quinoa Banana Choc Chip Muffin

 
Adapted from: http://www.onecooktwokitchens.com/gluten-free-banana-quinoa-muffins-and-the-grains-giveaway-continues/

Ingredients (modified to my tastebud):

  • 3 cups quinoa flour 
  • 1 cup almond meal
  • 4 teaspoons baking powder
  • 1 teaspoon baking soda
  • 2 teaspoon ground cinnamon
  • 1/4 teaspoon ground nutmeg (1/4 teaspoon if you have fresh)
  • 1/2 teaspoon salt
  • 1 cup chocolate chips
  •  1 cup walnuts broken into pieces
  • 2 large egg
  • 3/4 cup packed light brown sugar
  • 6 large mashed ripe bananas (approximately 1 1/2 - 2 cups)
  • 12 tablespoons canola oil
  • 2 teaspoon vanilla

  • Method:

    1. prepare the dry ingredients first. I used the Thermomix to made my quinoa flour and almond meal.
    I measured 3 cups of quinoa grains and blend in Thermomix on Speed 10 for 1 minute. Pour mixture into large bowl
    2. Next place raw almonds into Thermomix bowl (I used the same bowl from the quinoa flour). Blend for 40 seconds on Speed 10. I turn the dial slowly up to Speed 10 as the almonds are quite hard and can cause quite a fright in the house.
    3. Pour the almond meal into the bowl and whisk them together.
    4. Add in baking powder, cinnamon, baking soda, salt and nutmeg. Whisk them and blend them together. Add in the chocolate chips and the nuts and mix them slowly.
    5. In another Thermomix bowl, I add in all the wet ingredients. eggs, brown sugar, bananas (make sure the are really ripe, mine was really brown all over), oil and vanilla. Blend on Speed 4 for 10-15 seconds.
    6. Preheat oven to 180C
    7. Mix the dry and the wet ingredients. DO NOT over mix. Muffins just need to be barely combined. I stir from bottom up and big folds.
    8. I managed to get 24 muffins out of this batter. I used an ice cream scoop to get them into muffin cups.
    9. Bake for 15-18 minutes. Use the toothpick to check if it is cooked. Toothpick will come out clean when it is cooked.
    10. These muffins are really good. They are soft, moist and not tough. So this time the mixing is right.


      My batter ready to be bake

       large scoops for a good wholesome snacks for my kid's lunch box.

      after baking them. Nice straight out from the oven.

      They are healthy, packed full of good stuff. Please do try it

      Friday, January 24, 2014

      Salted Caramel Brownies

      Adapted from
      http://tenina.com/2010/05/salted-caramel-brownies/

      I changed the recipe to suit our taste
      Ingredients:
      280g rapadura sugar
      90g unsalted butter
      1 tsp vanilla essence
      2 tsp sea salt plus extra for topping
      4 large eggs
      1 large yolk
      60g cacao powder
      150g Plain flour
      200g each macadamia and pecan or pistachio kernels, Almonds or any desired nuts
      Extra nuts for topping

      DO:
      Preheat oven to fan forced 180°C and line a 22cm square pan with baking paper that comes up over the edges for easy removal.
      Place sugar, butter and vanilla into Thermomix bowl and chop together for 5 seconds on speed 6. Cook for 15 minutes at Varoma temperature on speed 2. Let it cool before the next step.
      Add salt and incorporate for 20 seconds on speed 4.
      Add eggs, yolk and cacao to Thermomix bowl and mix for 15 seconds on speed 5.
      Scrape down sides of bowl and add flour and nuts and mix for 10 seconds on speed 5.
      Spread into prepared pan, stud with additional nuts, sprinkle generously with additional sea salt and bake for 10 minutes.
      Remove from oven and bang on bench quite firmly to prevent rise from continuing. Return to oven for a further 20 minutes or until just wobbly in centre. I reduced the heat to 160 for a longer slow bake. Keep checking every 10 minutes.

      Allow to cool slightly in tin before cutting into enormous pieces and wolfing down immediately

       Before baking
       After baking. I will reduce the cooking time next time as it over baked it and the insides were more like cake texture instead of the fudgy brownie feel.

       All sliced up
      It tasted very nice with the salt and it was not too sweet as I have reduced the sugar. Perfect with a cup of coffee.. Happy Australia Day!

      Saturday, January 11, 2014

      Pineapple Tart Jam

       
      This is the season of pineapple tart making and I never find more love for the Thermomix than this time.

      Pineapple tarts are laborious and tiring via the traditional method as it requires hours of cooking the jam down to a nice thick jam-like consistency. I have been making pineapple tarts using the Thermomix for 2 years now and it has never been easier.

      This time I did it in bulk as I am very familiar with the process. We bought 4 medium size fresh pineapple and cut down into rough sizes. I added a tin of store bought pineapple slices just to increase the volume.

      Ingredients:
      - 2.5 kg of pineapple flesh. Cut and cored (~ 4 medium size pineapples)
      - 1 tin of pineapple slices (optional)
      - 500gms of sugar
      - 8 cloves

      Method:
      1. Chop the pineapple via Thermomix Speed 6 for a few seconds. You want a puree consistency
      2. I did this is batches and then I sieve the pineapple through a strainer to get rid of as much juice possible
      3. Save the juice for consumption or cooking
      4. After sieving all the pineapple, it will easily fit into the Thermomix. I cooked this for 30 minutes, Varoma, Speed 1. I need to place the Varoma tray on top to get most of the steam out and to avoid a messy splatter
      5. Look out for a nice jam-like consistency and a lightly brown colour. I like my jam abit soft so it just melts into your mouth.


       Weighing the pineapples with the Thermomix.
       The amount of juice extracted from the pineapples.

       The flesh that will be cooking in the Thermomix
      the final product.

      Now to get a spot on shortcrust pastry to go with it

      Thursday, January 02, 2014

      Greentea Cheesecake Tart

      Adapted from :http://happyhomebaking.blogspot.com.au/2013/04/matcha-cheesecake-tart.html

      Ingredients (makes a 22cm tart and extra dough for 3 small tarts):

      for the tart crust:
      150g unsalted butter, cut into small cubes, softened at room temperature
      80g caster sugar
      1 egg, lightly beaten (about 55g without shell, use room temperature egg)
      250g cake flour
      60g ground almond (almond powder)


      for the filling:
       2 teaspoon gelatine powder
      30 ml water
      250g cream cheese, leave to soften at room temperature
      80g caster sugar
      80g plain yogurt
      4 teaspoon lemon juice
      320g whipping cream (I used non dairy whipping cream)
       4 teaspoons matcha/green tea powder

      Method:

      to make the tart crust:

      • Lightly grease an 22cm tart pan (with removable base) with butter, set aside. 
      • Toast almond powder at 100 degC for 10 mins. Stirring in between. Let cool.
      • I used the thermomix to beat sugar and butter on Speed 4 for 15-20 seconds. The mixture should look pale. I then add in the eggs and the ground almond and give it a good mix.
      • Sieve the  flour into the bowl and then use the Turbo function to mix it up till it resembles crumbly breadcrumbs.
      • Gather the mixture into a bowl and start to bring them together into a ball. After it is nicely combined, flattened the ball into a flat disc and use plastic cling to wrap the disc.
      • Store in freezer for 15 minutes.
      • Remove dough and roll it between 2 sheets of baking paper. I rolled it into a big sheet and gently put it over the tart tin..
      • Use the dough that is broken off to mend parts of the tart tin that is broken.
      • Prick the dough surface with a fork (this helps to prevent the pastry from puffing up when baking). Cover and chill the tart crust in the fridge for 20mins (this helps to prevent the pastry from shrinking too much after baking.) 
      • Line a sheet of parchment paper over the tart base. Place baking beads/weights on the parchment paper (I used rice as baking weights), enough to cover the tart base. 
      • Bake in pre-heated oven at 180 degC for 20 mins. Remove the baking beads and parchment paper. Put it back into the oven and continue to bake for another 15~20mins until the crust is golden browned. Let cool completely. Leave the crust inside the tart pan, do not unmould.
       The picture on the top left is the dough after bringing all the mixture together. It should come together nicely without being too dry or wet.
      The next picture is the weights on the pie for blind baking.
      Bottom left are the ingredients ready for making the filling.
      Last pic is how the crust looks like after baking. Mine was abit over brown on the edges so might want to reduce baking time in the future

      to make the filling:
      • Dissolve the gelatine in water and set aside for 10min. 
      • Combine the sugar and yogurt in a pot over medium heat to dissolve the sugar. Stir in the gelatine solution until it’s dissolved. Remove from heat.
      • Place cream cheese and mix on Speed 5 for 10-20 seconds till it is nice and smooth. Add in the cooled yoghurt-gelatin mixture and then mix it again for 5 second. 
      • Add in lemon juice and mix on Speed 4 for 3 second
      • Whipped the cream till soft peaks form. With a spatula, fold in 1/3 of the whipping cream to the cream cheese mixture. Fold in the remaining whipping cream to the cream cheese mixture. **I tried to use the thermomix for this but somehow it did not turn out nice. I think i may have my cream on the bench for too long as it needs to be really cold before whipping. My turned into large clumps and in the end i had to add to the cream cheese and use the Thermomix to blend the entire mixture up.
      • Add in the matcha powder and mix until blended. 
      • Pour the mixture into the tart pan until it is full.
      • Chill the tart for at least 2 hours until it is firm. Unmould before serving  
       This is the tart after chilling for more than 2 hours. it was nice and firm, abit tricky to cut as pastry is hard. I used a steak knife with jagged end to slowly dissect the tart.

       the pastry was slightly crumbly but the taste is good. I will definitely incorporate almond meal in my shortcrust pastry next time.

      I did not do the motive as per the original recipe as i was so tired. This recipe has alot of steps and planning to do before getting to the final outcome. The pastry needs to be chilled and baked and cooled. The filling itself has so many sub steps too.

      I will definitely not attempt this with green tea but will definitely do another version of cheesecake with this crust.

      Sunday, December 01, 2013

      M & M Birthday Cake

      Another milestone for the family. Cake recipe adapted from:
      http://www.howtocookthat.net/public_html/best-chocolate-cake-ever/

      Butter cream recipe also adapted from the same site:
      http://www.howtocookthat.net/public_html/buttercream-cupcake-frosting-recipes/

      Chocolate Cake Ingredients:
      200g (7.05 ounces) 70% cocoa dark chocolate, I used Plainstowe Chocolate bars.
      320gms Butter
      8 eggs
      2 1/4 cups caster sugar
      1 1/4 cups plain flour
      1/4 cup cocoa powder, I used Plainstowe dutch processed cocoa powder
      1 1/2 tsp baking powder

      Method:
      1. Melt chocolate bar and butter in microwave. Check every 30 seconds to ensure all ingredients are melted nicely. Place aside for it to cool

      2. Whisk egg and sugar together. Thermomix Speed 4, 5 seconds
       
      3. Combined egg and chocolate mixture from Step 1. I used Speed 4 for 10-15 seconds. 
      4. Sift the dry ingredients, Flour, Cocoa powder and baking powder

      5. Mix in the dry ingredients in the wet ones. I used the same Thermomix settings and just stop when all ingredients are nicely incorporated.
      6. I distribute the mixture between 2 round 9 inch baking tins. Baked this for 20 minutes at 160C


      Butter cream Ingredients:

      120g (4.23 ounces) butter
      1 1/3 cups icing sugar
      1/2 cup cocoa powder, i used the same Plainstowe powder as the cake.
      1-2 tsp milk

      Iced the cake when it is cooled.

      For decorations, i used Cadbury chocolate fingers ( 3 packets), 4 packets of M & Ms. Just lined the chocolate fingers around the cake and then decorate as you like for the top of the cake.


      Tuesday, November 19, 2013

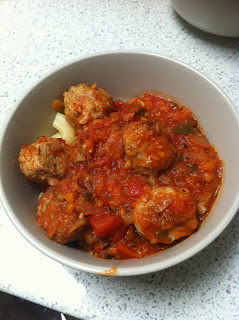
      Meat Balls and Pasta

      Another one of my experiments with minced and pasta.

      The last time i made spinach meat balls, it tasted quite dry. This time i tried with different ingredients and cooking method. The outcome is moist meatballs but need to cut down on the amount of bread crumbs next time.

      Ingredients (meatballs):
      - 500gms on minced. I used pork this time
      - Half a zuchinni
      - 1 onion
      - 3 cloves garlic
      - Salt and Pepper for seasoning
      - 1/2 cup of breadcrumbs soaked in milk
      - 2 eggs (lightly beaten)

      Ingredients (pasta sauce)
      - 4 large ripen fresh tomatoes
      - 1 can of diced tomatoes
      - 1 bottle of Domios Pasta sauce (optional, i only added this cause i cooked in large batches and needed more sauce)
      - 1 carrot
      - half zucchini ( leftover from meatballs ingredient)
      - 1 Onion
      - 4-5 cloves of garlic
      - handful of fresh herbs ( i used basil)
      - handful of dried herbs( i used oregano)
      - Salt and pepper to taste
      - 1 tablespoon of sugar
      - Olive oil to cook

      Pasta
      - 700gms of elbows
      - pot of water (add olive oil and salt)

      Method:
      1. Prepare the meatballs first
      2. I used the Thermomix to blend the vegetables and mix all the ingredients. Speed 5 and check for desired consistency. A food processor will work just fine for this.
      3. Minced the zucchinni, onion and garlic. Add the minced meat, egg, soaked breadcrumbs and seasoning
      4. Roll the balls and placed them on a lined baking tray
      5. Baked them on 175C for 20 minutes. You don't need them cooked as they will cook again in the pasta sauce

      6. While the meatballs are baking, continue with the pasta sauce.
      7. Heat a large saucepan with olive oil
      8. Placed all minced ingredients and cook till they are tender
      9. Pour in diced tomatoes, fresh tomatoes, herbs seasoning, sugar and just cook till sauce thickens
      10. I cooked this for a good 20-30 minutes and kept on adding seasoning till the right taste is achieved.
      11. While the sauce is cooking, start with cooking the pasta. I used elbows. Follow packet instructions to cook.
      The final dish. Meatballs had way too much breadcrumbs cause i accidentally pour more than a cupful of them. A reminder to not repeat that.

      There a more steps in preparing this dish but it provides a good balance for the family and it is also an enjoyable meal. I have freeze some meatballs and plenty of leftovers for everyone the next day.


      Tuesday, November 05, 2013

      Apple Crumble

      I love tart desserts and love anything with apples and nuts.
      We had some friends over on Melbourne Cup Day and i wanted to make something refreshing. I put together this recipe from the internet and just modified it to suit my taste. It was abit too tart but i love it that way. Not such a hit with the kids but the adults like it. Healthy, refreshing and in my opinion yummy. Please do try it.

      Ingredients (crumble):
      - 75gms walnuts
      -100gms almonds (with skin on)
      - 100gms flour
      - 85gms butter
      - 1 teaspoon ground cinnamon
      - 40gms raw sugar (adjust to suit taste)

      Ingredients (fillings):
      - 3 large green apples (skin peeled and cored)
      - 2 large pears (skin peeled and cored)
      - 1 bunch of Rhubarb (pick the nice red parts and chopped to 2 cm sizes)
      - grated ginger (just a small piece)
      - good squeeze of lemon juice (half a lemon)
      - 35gms honey
      - 10 gms of brown sugar

      Method:
      - I cooked the filling first. Chopped and core all the fruits. I squeeze a whole lemon in which is why it is so tart. I think half a lemon will be good enough for this recipe.
      - All the fruits total to 1kg in the Thermomix and place all ingredients in the bowl
      - Cooked it for 8 mins/100degress/Speed 1
      - Place the cooked filling in the baking dish. I let it set for a while and baked it only when it is ready to be serve.
      - while the filling is cooling down, i proceed with the crumble. 
      - I pre toasted (7 mins at 175C) the walnuts and almonds to give it an extra crunch. I also saved some chopped walnuts to sprinkle on top of the crumble before the baking process.
      - Place all the crumble ingredients in the bowl. I used the turbo button to slowly get the consistency i like. I prefer by crumble with a slight texture, if you like it really fine, then you can get it to mix longer in the processor.
      - As my filling was too tart i had to add more sugar for the crumble. Feel free to adjust as you go.
      - I set the crumble aside and just spread it on top of the filling when ready to bake. Remember to sprinkle with more nuts.
      - Bake for 20 minutes or golden brown on a 180C oven.
      - You can substitute with any nuts.


       The filling getting ready to be cooked in the Thermomix

      Pre toasted nuts.
      The beautiful colour of Rhubarb. I have never used them in any cooking but they taste delightful. Nice tart taste which combines nicely with the apples and pears. I serve the apple crumble with vanilla ice cream and yet it was still tasting way too tart. :) cool it on the lemon next time ..

      I did not have a chance to take a picture of the final product as everyone was digging into it way too fast. But definitely a keeper for hot summer dessert.

      Saturday, November 02, 2013

      Vegemite/ Ham & Cheese Scrolls

       
       Ingredients (Vegemite):

      250 g white baker's flour
      250 g wholemeal baker's flour
      50 g chia
      2 tsp dried yeast
      40 g extra virgin olive oil
      1 pinch sea salt
      300 g lukewarm/tepid water
      20 g butter, melted
      2 tbsp Vegemite
      200 g mixed cheeses grated

      Ingredients (Ham and Cheese):

      250 g white baker's flour
      250 g wholemeal baker's flour
      50 g chia
      2 tsp dried yeast
      40 g extra virgin olive oil
      1 pinch sea salt
      300 g lukewarm/tepid water
      Pizza base sauce (2 sachets)
      150gm shredded ham
      200 g mixed cheeses grated

      Method (same for both, just switch ingredients at Step 5):

      1. Make dough by placing flours, seeds, yeast, olive oil, salt and water into TM bowl and mix for 6 seconds on speed 6. With dial set to closed position Closed lid, knead dough for 2 minutes on interval speed dough mode.
      2. Place dough in an oiled bowl and allow to prove in a warm place for 15-20 minutes. (You could cover the bowl with a clean, damp tea towel and place in oven set at 40 degrees C).
      3. Meanwhile, place the cheeses into the TM bowl and grate for 8-10 seconds on speed 8.
      4. When dough has risen, pre-heat oven to 220 degrees C. Use a little of the melted butter to grease a rectangular ovenproof dish.
      5. Turn the dough out onto a floured surface and roll out into a large rectangular shape. Brush with a little of the melted butter and all of the Vegemite. Next, sprinkle almost all of the cheese on the dough taking care to cover all the edges.
      6. Carefully roll into a large sausage shape and use a serrated knife to cut into 10 x 5cm rounds. Turn filling side up and arrange in the baking dish next to each other so there are no gaps.
      7. Brush the scrolls with a little butter, sprinkle with extra cheese and bake for approximately 15 minutes or until golden brown. The Cheesy-mite scrolls are best eaten straight from the oven but can frozen and defrosted later for the school lunchbox


      My dough ready to rise. It took me an hour to double its size. i made double the recipe as i want to make two different types of scrolls.


      Flour the surface and get ready for rolling the dough. I cut it to a nicely shaped rectangle. It makes it easier to roll when the shape is consistent


      Spreading the vegemite over the butter.

      Roll them tight into a huge long sausage :)

       
       All done, getting ready to be bake in the oven. Just waiting for the ham n cheese counterpart.


      Spread pizza sauce all over the dough for the ham and cheese


      Sprinkle and go crazy with the ham and cheese. Ham then later cheese


      Nicely rolled and waiting for the final touches.

      I used up the remaining butter to spread on the scrolls and then sprinkle with a bit more cheese.

      Ready to be baked. It took me 20 minutes to complete them
      i rotate them between the shelves in the oven just to get an even bake.

       
      Both look the same but the top is the vegemite and i the bottom is the hamd and cheese scrolls